Android captive portal
Last updated : 16/8/2023
Introduction
This is my guide on configuring connectivity checks on Android cellphones, based off Mullvad's guide with some changes to accomodate rooted users as well.
Prerequisites
Required stuff :
- An Android device with either USB debugging or root access (Magisk / KernelSU) enabled
- For USB debugging approach (recommended regardless of root access)
- A computer with adb installed
- A USB cable to connect Android device & computer
- Termux / any latest Android terminal emulator that can use root (for Magisk approach - usable without computer, but less recommended - for example, Termux is rather shaky with ≥A12)
Preparation guide (USB debug) :
- Open terminal in computer
- Ensure Android device has USB debugging enabled by entering Developer options
- Connect computer & Android device
- Grant computer adb shell access with the command:
adb shell
Alternatively, when adb shell access is only required for each command, insert adb shell before inserting command.
Preparation guide (Magisk / terminal emulator) :
- Ensure Android device has Magisk installed (both the Magisk-patched image & Magisk apk)
- Install & open terminal emulator app
- Type su in terminal & grant the terminal app root access when prompted
The prompt will not appear if the full Magisk app is not yet installed, even if Magisk is already flashed.
Captive portal mode
Captive portal mode values :
- 0 : Disables captive portal / don't attempt to detect captive portals.
- 1 : Default settings; displays a notification for sign-in prompt whenever captive portal is detected.
- 2 : Automatically disconnects from network & no longer auto-reconnect to it whenever captive portal is detected.
To show current captive portal mode :
settings get global captive_portal_mode
To change current captive portal mode :
settings put global captive_portal_mode [mode]
Captive portal server
For those who'd like to use captive portal, first read the captive portal provider list for more information on which captive portal servers to use. Then, use these commands:
- settings put global captive_portal_http_url (your preferred captive portal provider's HTTP URL)
- settings put global captive_portal_https_url (your preferred captive portal provider's HTTPS URL)
- settings put global captive_portal_fallback_url (your preferred captive portal provider's fallback URL, or their HTTP/HTTPS URL)
- settings put global captive_portal_other_fallback_urls (your preferred captive portal provider's other fallback URL, or their HTTP/HTTPS URL)
- reboot
To verify captive portal url changes :
Disclaimer : This only works for user-set captive portal urls. Therefore, stock default captive portal urls cannot be documented / extracted with this method.
- settings get global captive_portal_http_url (or, replace http_url with either https_url, fallback_url, or other_fallback_urls; depending on which one you'd like to check)
- Exit shell with exit command, no reboot necessary
GUI-based solutions
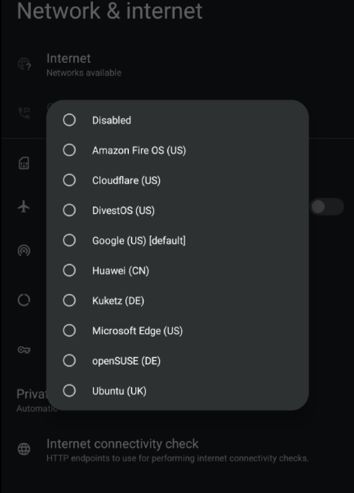
Sometimes, your custom ROM might have something like this:

In which case, you can just pick the ones you trust. Unfortunately, if this is present, you can't really use the terminal-based guide above.
Back to top
Android Privacy Mod - Basic
Index - cellphone
Main Page
